Managing Service Requests and Leads
Account Managers/Administrators can accept the service requests received from Customer Hub, convert leads to customers and convert requests to Work Orders, Inspections, and Quotes.
Customers can create service requests in Customer Hub to get various jobs done. These requests will be listed on the CRM > Requests page. Prospective customers who have submitted service requests and are new to the ReachOut Application will be displayed on the Leads page.
Managing Service Requests
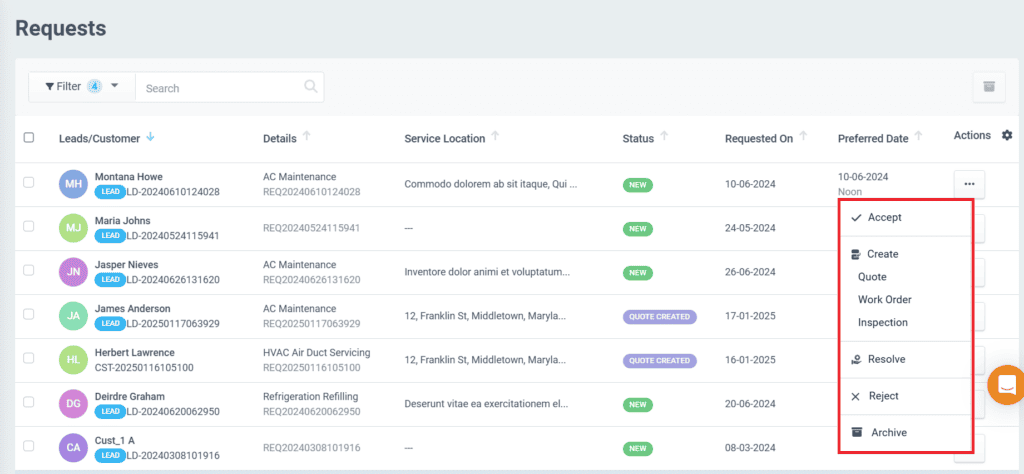
All the service requests will be listed on the Requests page of the ReachOut Web App. You may accept/approve the service request if you consider the request to be valid. If a job has to be done for the service requests, you may create a work order/inspection. Also it is possible to create a quote for the job done and send it to the customer for further payment processing.
Some requests can be resolved over a phone call and marked as resolved. Requests for which no action has to be taken can be rejected. You may archive old service requests from the Requests page.
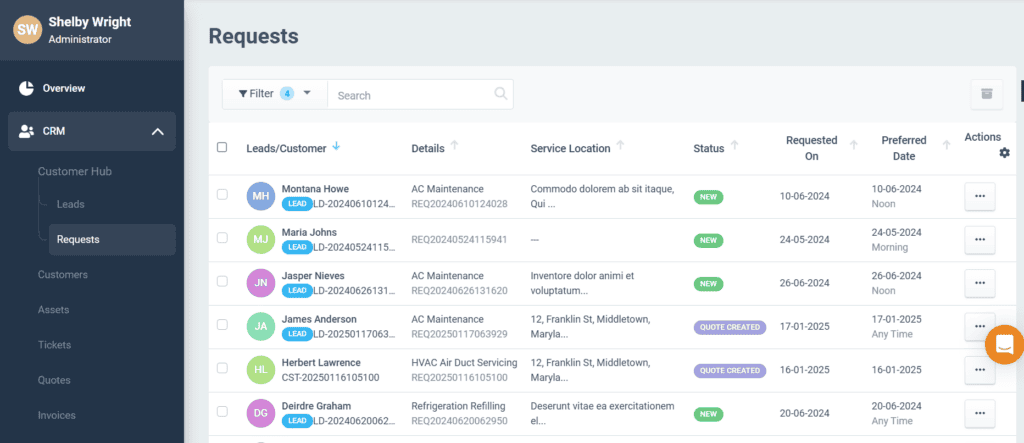
- Account Admin can view the Leads (prospective customers)/Customer name, Lead ID, Service Request details, Service Location, Status, Requested Date, and Preferred Date.
- The Account Manager/Account Admin can click on the three dots in the Action column to accept, resolve, reject, archive, or create a work order/inspection/quote for the requests.
- You may accept the service request from Customer Hub if you find it valid.
- You may create a work order/inspection/quote for the service requests.
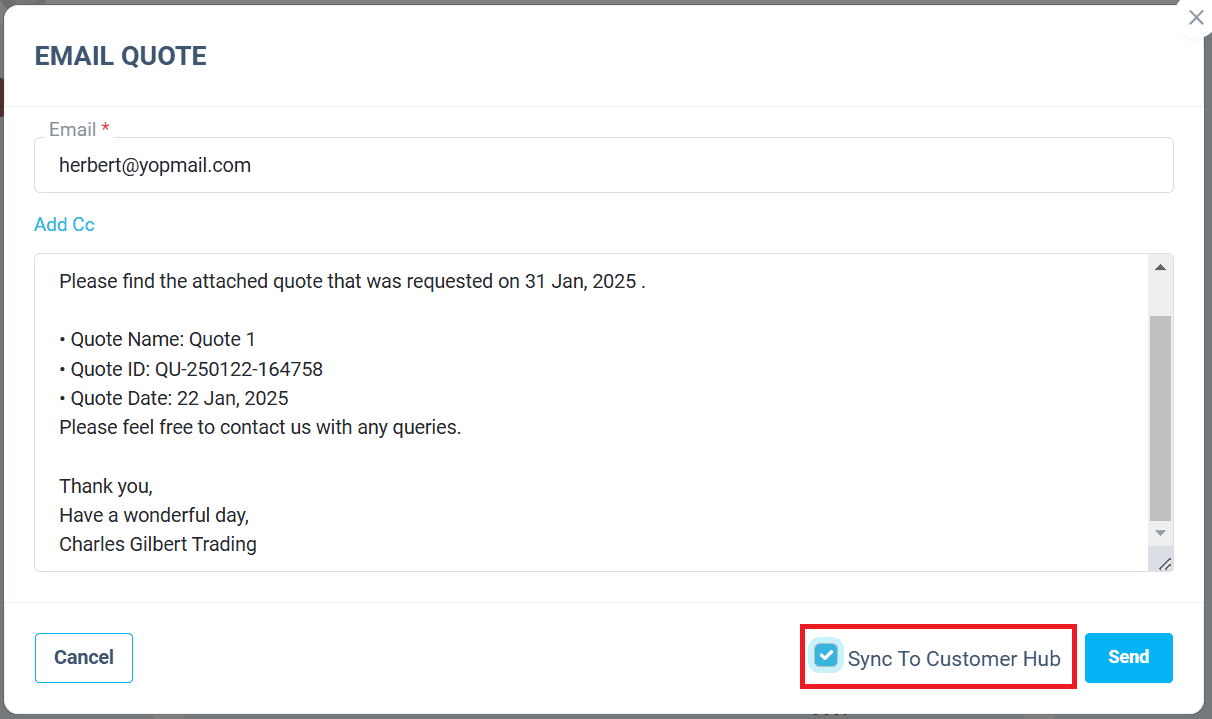
- To create a Quote, click on the three dots in the Requests page against the lead/customer, and click on Quote.
- Admin can share this Quote with the customer by:
- Clicking on the Sync to Hub button on the Quotes page.

- Tick the Sync to Customer Hub option while sending the quote to the customer.

- The quotes synced will be displayed in the Quotes tab of the Customer Hub.
- Clicking on the Sync to Hub button on the Quotes page.
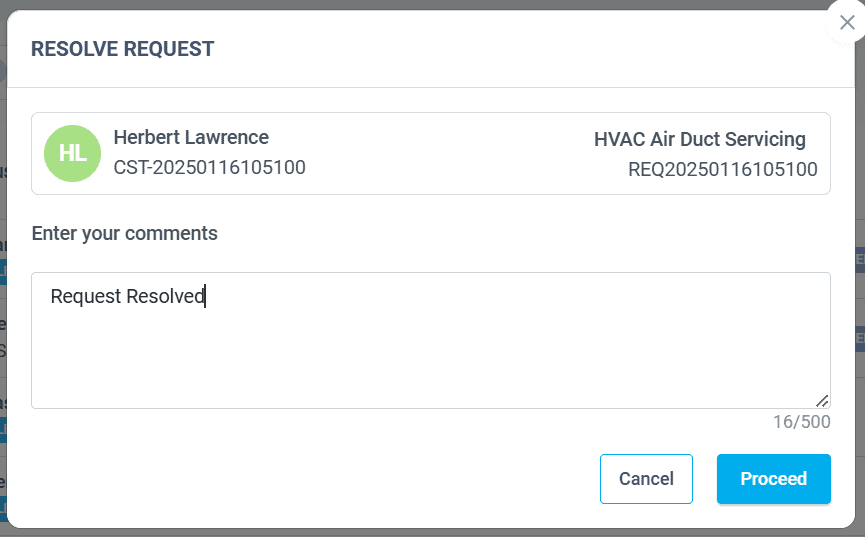
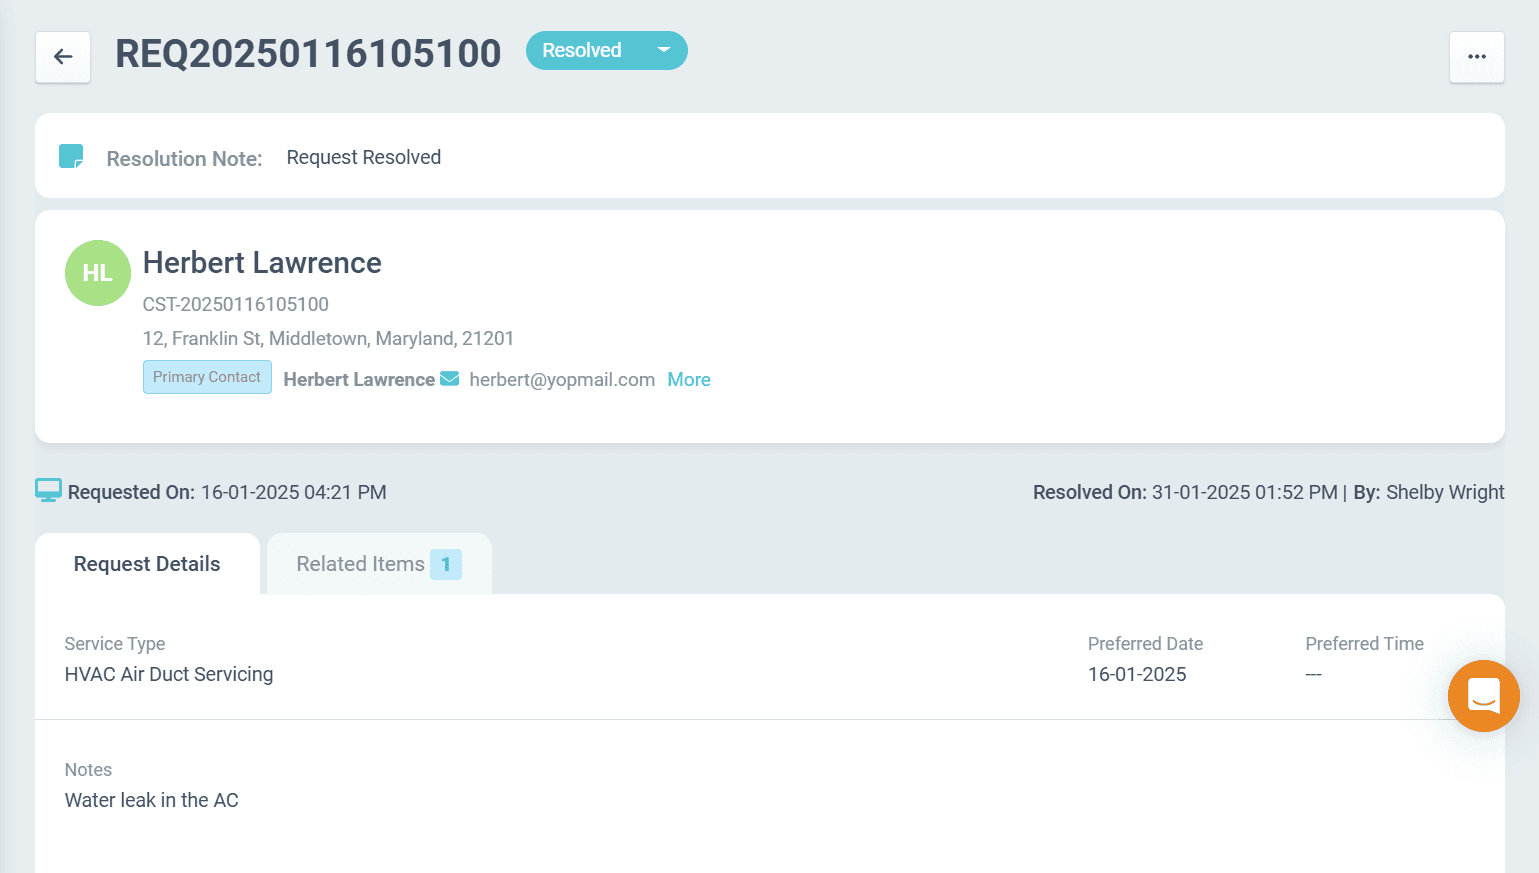
- If the issue is solved for the service request received, you may click on the Resolve option and resolve the request.
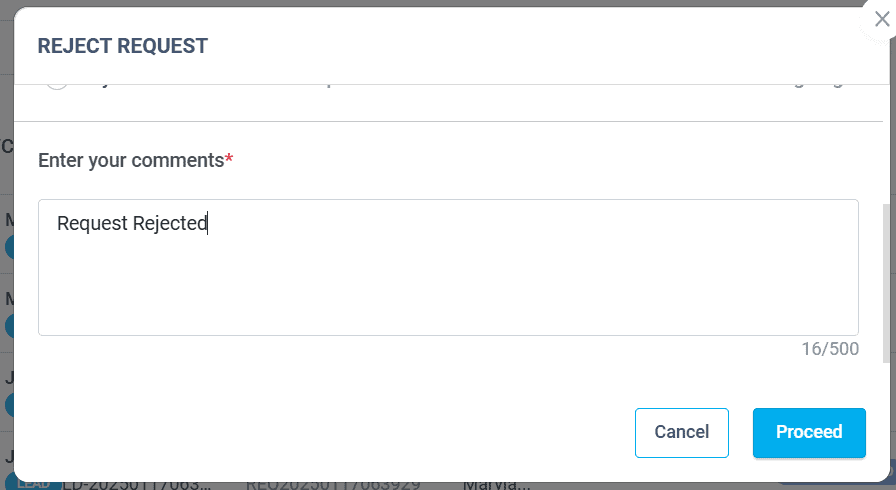
- A pop-up message appears, where you may enter the comments and click Proceed.

- Click on the resolved request to view the resolution note of the request.

- A pop-up message appears, where you may enter the comments and click Proceed.

- You may archive the requests for future reference by clicking the Archive option. While archiving the request, a confirmation message appears, and you may click the Proceed button. The archived requests will not be displayed on the Requests page.
- To view the archived requests, click the Archived button in the Filter option.
- Archiving the request will not archive the Jobs/Quotes/Invoices created based on that request.
- If the Account Admin wants to reject the request, they may do so by clicking the Reject option. In the Reject Request pop-up, you must enter the reason for rejection.
NOTE: The customer will receive a notification email when the service requests are accepted, resolved, or rejected.
Managing Leads
The “Leads” are displayed on the Leads page under the CRM menu to identify the prospective customers. This helps you prioritize your time and resources to convert leads into customers. Lead labels can be viewed from the Requests and Leads pages.
Note: If the email address in the service request form does not exist in the ReachOut Application, the service request will be considered as a Lead.
You can view the lead name, lead ID, organization, address, total service requests, email id, and phone number.
NOTE: An email will be sent to the lead’s email address and they can click on the Login button to enter the Customer Hub.
Converting Leads to Customers
If you find a lead as a prospective customer, you may either convert the lead to a new customer or map it to an existing customer.
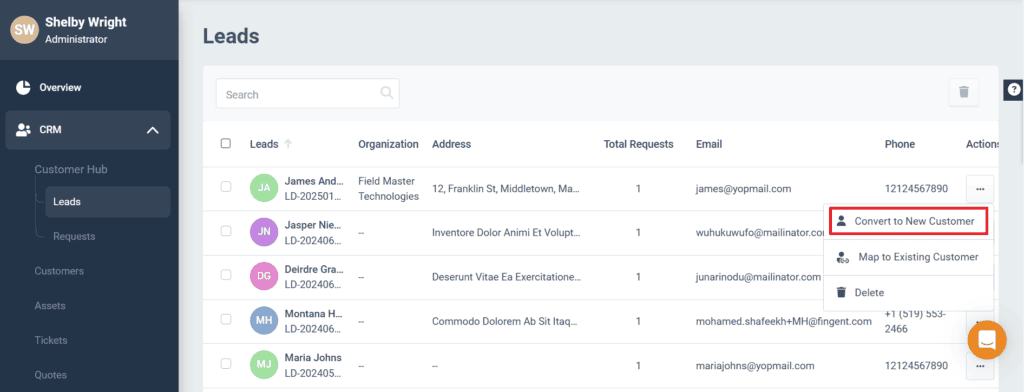
- On the Leads page, click the three-dot button in the Action column and select the ‘Convert to New Customer’ option.
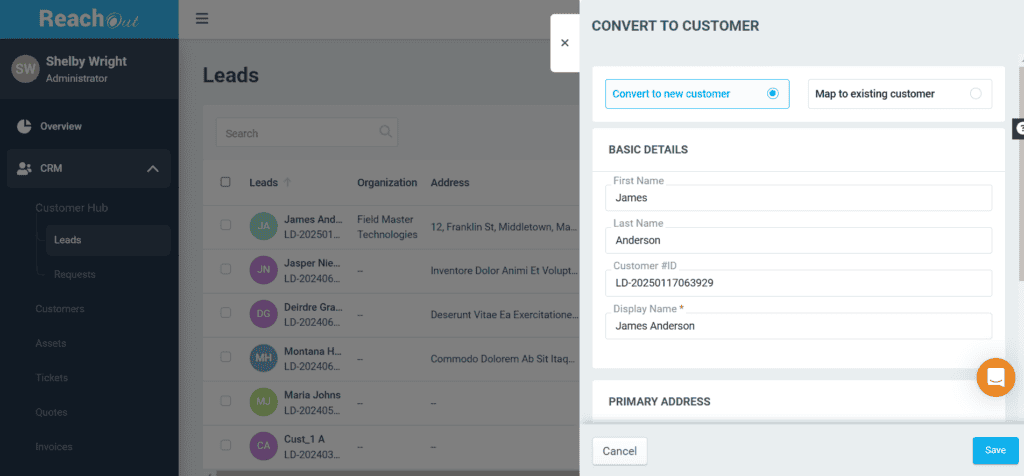
- The basic details, primary address, and primary contact will be pre-filled in the’ Convert to Customer’ pop-up. You may edit the details if required. Click on the Save button. The leads saved will be displayed on the Customers page.
- Click the three dots button in the Action column on the Leads page and select the ‘Map to Existing Customer’ option.
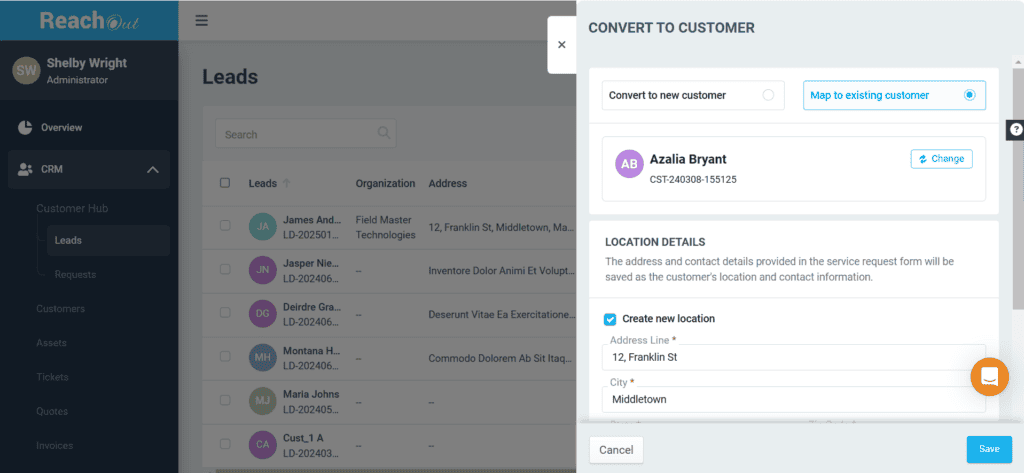
- In the ‘Convert to Customer’ pop-up, select the existing customer to be mapped. They can edit the details if required and click Save.
- Untick the ‘Create new location’ to select the existing location for the customer.
Note: While converting leads to a customer, the address and contact info submitted in the service request form will be saved as a location and its contact on the Customer Details page.