Assigning a Job
A Work Order or Inspection can be assigned or dispatched from one of two places:
- Using the built-in Calendar
- From the Work Orders/Inspections Home
Using Calendar
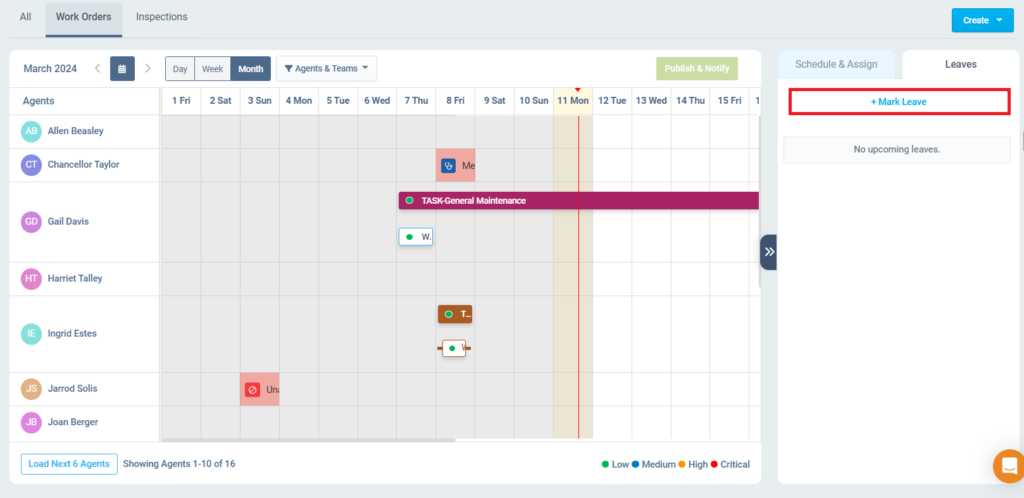
The Calendar tool helps Account Managers/Administrators/Service Managers schedule and assign multiple jobs to the field agents. It gives an overview of the Jobs that have been unassigned and unscheduled.
The built-in Calendar helps you drag and drop the jobs to assign and schedule them. It displays the workload of field agents, organizes their tasks, and allows for scheduling on a daily, weekly, or monthly basis.
Now, we’ll walk you through the Calendar Interface.
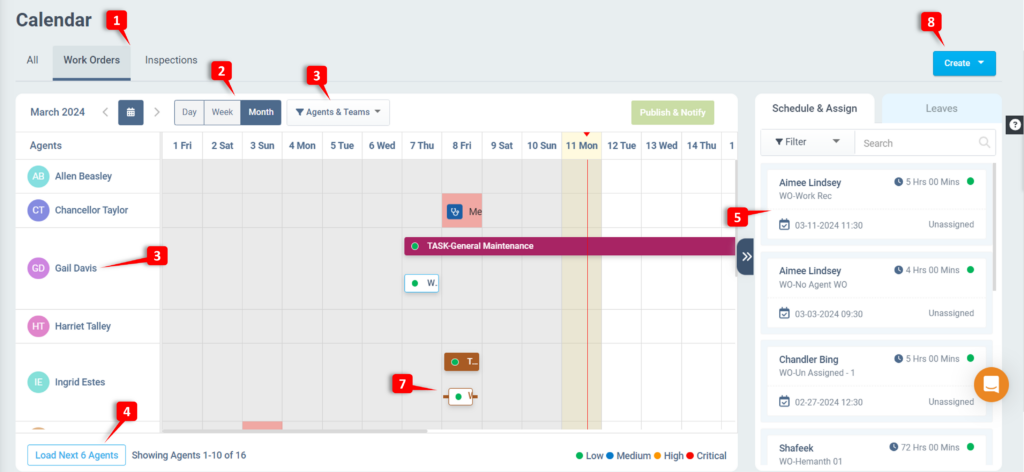
Using the Calendar, the Administrator/Account Manager/Service Manager can:
- List the Work Orders and Inspections as separate tabs.
- Monitor the workload and availability of the field agents for a day, week, or month
- Filter Jobs based on the teams and agents.
- Viewing 10 field agents initially and clicking the Load Next button displays the next set of 10 agents along with the initial 10 agents.
- View the unassigned and unscheduled jobs listed on the right side.
- Drag and drop these Jobs to assign them to the field agents.
- View the WO/Inspection as a line and the Tasks as bars below the Job.
- Quickly create Work Orders/Inspections/Leaves using the Create button.
Scheduling and Assigning Jobs
Now, let’s look into the actual scheduling process.
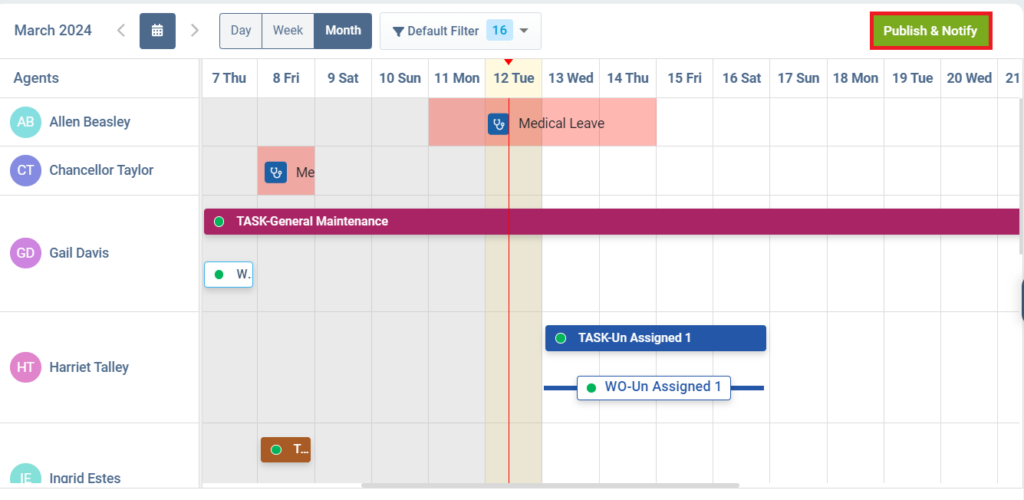
- View the Jobs based on a Day, Week, or Month.

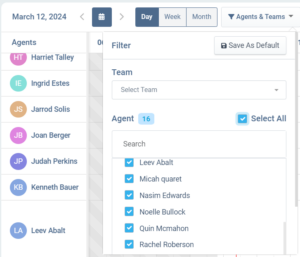
- Filter Jobs based on the Agents/Team.
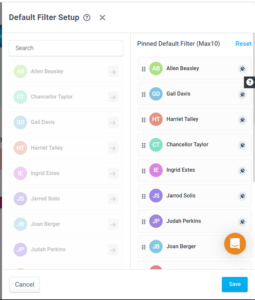
- It is possible to display the field agents based on your priority using the Default Filter Setup.
- Select the required agents in the Agents & Teams filter to set the default filter and click the Save As Default button.
- In the Default Filter Setup, click the arrow next to the field agent to prioritize them on the Calendar page.
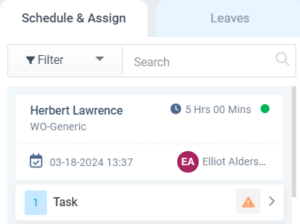
- Click the Schedule & Assign tab to view the unassigned/unscheduled Jobs/Tasks. Displays them as separate cards with Customer Name, Job Type (WO / IN), Job Duration, Job Description, Job Start Date & Time (if scheduled), Agent Name (if assigned), Priority, and Task count. The warning sign next to the (Work Order/Inspection)/Task indicates they are either unscheduled/unassigned.
Note: The warning sign will be displayed in either of the following:
- Task has been scheduled but not assigned.
- Job has been assigned and scheduled but the field agent is on leave on the scheduled date.
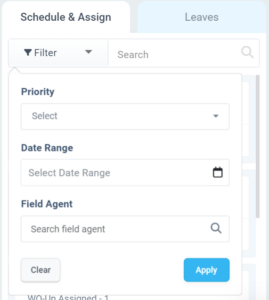
- Filter the unassigned/unscheduled Jobs based on their Priority, Date, or field agent.
- Click on the required unscheduled/unassigned Jobs from the right panel and drag & drop them to the respective field agent.
- Once finalized, click the Publish & Notify button to dispatch the Job/Task to the Mobile App. The Jobs and Tasks will be marked in the Calendar.
- The Field Agent will be notified by the ReachOut mobile App.
- If a customer email notification is enabled through Settings, a notification email will be sent to the customer when the job is scheduled and assigned to a field agent. To learn more about how to set the customer notification, click here. (Link to customer email notification)
Editing the Jobs & Tasks
If you want to make changes to the assigned jobs/tasks, it is possible through the Calendar.
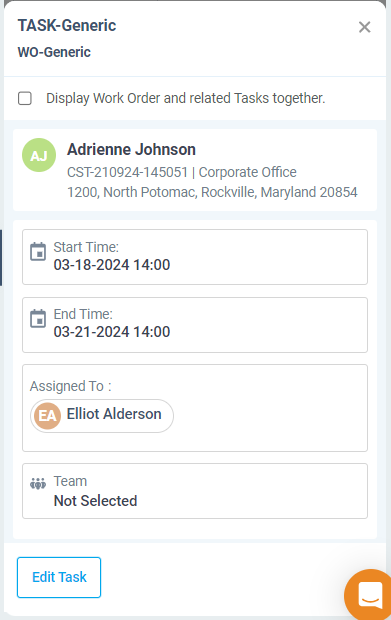
- Click on the Job/Task to edit the Job and related Tasks. The job details will be displayed on the pop-up screen on the right side.
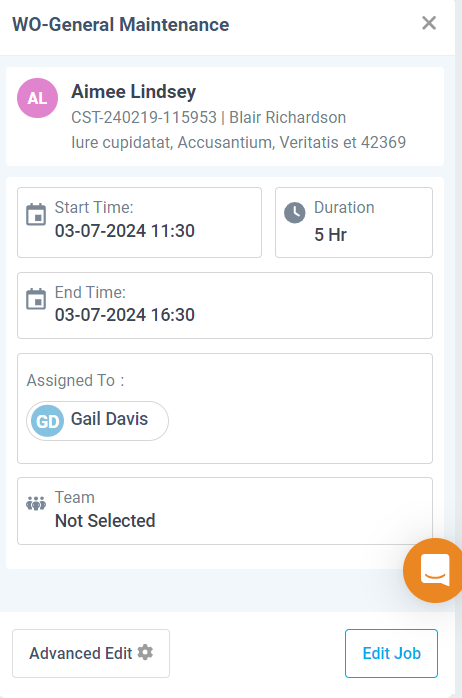
- Click the Edit Job button to edit the basic and task details in the displayed pop-up.
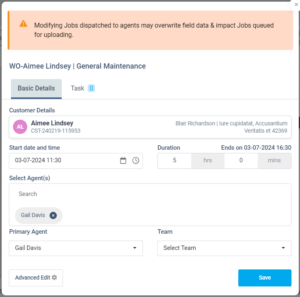
To edit the basic details, edit the following in the pop-up shown:
- Job Start Date & Duration
- Agents assigned
- Primary Agent
- Team of the Field Agent
- Click the Save button to save the Job/Task details.
- Click the Advanced Edit button to navigate to the Work Order/Inspection Creation page to edit more details.
Tasks
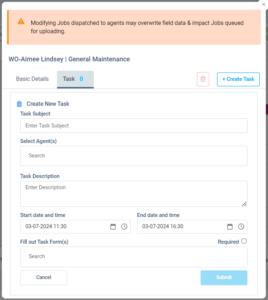
To create the Task, click on the + Create Task button. You may select/enter:
- The subject of the Task
- Field Agent
- Task Description
- Start Date, End Date, and Time
- Task Forms, if required
- Click the Submit button to save the Task details
The Tasks tab displays all the tasks created. To edit the Task, click on the Task and update the details.
Marking Leaves for Field Agents
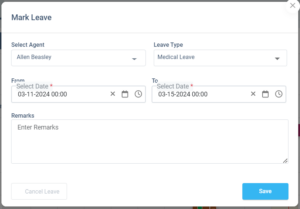
The Admins/AMs can mark the field agent’s leaves by clicking the + Mark Leave button in the Leaves tab.
- In the ‘Mark Leave’ pop-up displayed, you may select/enter the agent name, leave type, from and to dates, and remarks.
- The Leaves tab lists all the leaves created for the field agents.
- The Leaves are displayed with a pink background in the Calendar.

- If you want to update the leave details, click on Leave and edit them in the pop-up.
- If the field agent needs to delete the leaves planned, you may click the Cancel Leave button. On cancellation of the leaves, it will get removed from the Calendar.
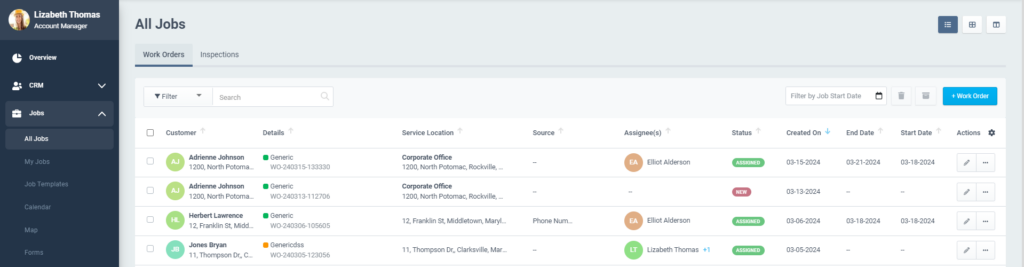
Assigning From Work Orders/Inspections home
It is possible to quickly assign the job to the field agents from the Work Order/Inspection pages.
- You can edit the job for assigning it to a field agent by clicking the pencil icon under the actions column.
- Make edits to the Work Order or Inspection by setting the job duration, start date, and time and also select field agents for the job.
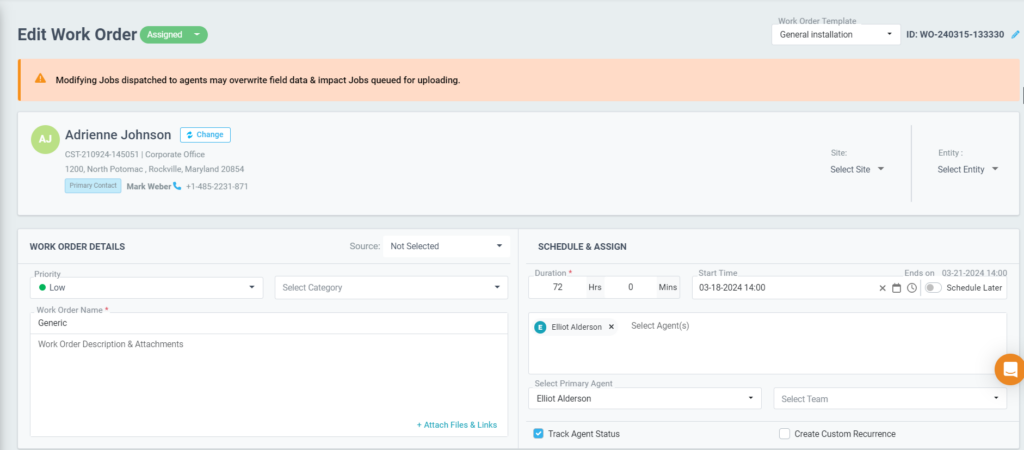
- Once done, save the Work Order/Inspection. This will assign a job to the selected technicians, who will be notified of the new assignment via the ReachOut App on their phones.